Monday, July 1, 2013

Happy July!

As you may or may not know, I love making my own clothes. I find it very rewarding, last night I made this just in time for the 4th of July. This is a pretty easy diy project, my biggest problem is finding a place to spray the shirts. Luckily I have a small outside patio with some secondhand furniture I don't mind dying :)
This was a relatively inexpensive craft since I already had most of the necessary things.

This is the same process that I've used before, put I'll put up the instructions just in case :)

You'll need:
  • White shirt, washed and dried, 1 size too big, will shrink.
  • Spray dyes
  • stickers, painters tape, etc. as a stencil to spray
  • soda ash (optional, but will help the colors stay in the shirt!)

Prepare the soda ash as directed on the box, soak fabric as directed and allow to dry.

Apply stickers and painters tape as you desire on the shirt. Remember that what gets taped will be white. Tape both the front and back of the shirt.

In an appropriate area (as in, somewhere you may accidentally spray with dye), spray the shirts with the desired color. I used red on bottom and blue on top for mine :) 


Allow to dry, then flip over and spray the opposite side.

Once shirt has dried, heat set in the dryer on high setting for 20 minutes or iron.

:) Happy Independence Day America

Sunday, June 16, 2013

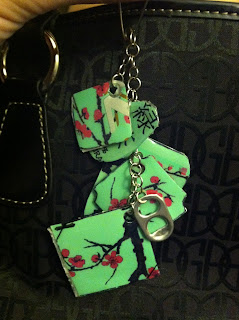
DIY Upcycled Can Key Chains

DIY Upcycled Can Key Chains 


You'll Need:

  • Clean, empty soda cans
  • Manual Can Opener
  • Tin Snips
  • Needlenose pliers
  • Hole Punch
  • Mod Podge Dimensional magic
  • Chain Links & key ring

Start by cutting up your can. I used a can opener on the top to get that off first. Be really careful because the metal is super sharp. The can opener leaves the metal jagged so be sure to wear safety gloves.


Take off the top half inch of the can with the tin snips.

Cut down along the side of the can with the nutrition facts, then cut the entire bottom off. You'll be left with a flat (kind of) rectangular piece of tin.

Trace the shapes you would like to cut out with a sharpie. You can draw them on the inside or the outside of the can, whatever you find easier to work with. I also recommend using shapes that do not have sharp edges. The sharp edges can pull at clothes and fabric.

Cut holes in each near the edge with a hole punch. If you are planning on gluing them together, make sure the holes are each on the proper side.

You can leave the pieces to be one sided and the other side will just be silver. I chose to glue two pieces together, which proved to be a bit tricky.
I used tacky glue, but in retrospect I should have used E4000.

Etch the silver sides of two identical pieces with a file, apply glue. Press and hold together 30 seconds, then secure with a  clip. Leave to dry for at least 48 hours.


You can also cut out longer strips of tin and fold it in half. Still glue and clamp for 48 hours.


Once glue is dry, apply the dimensional magic mod podge. It has a small applicator tip that you can squeeze the mod podge out and apply it as necessary with. Use 2-3 coats per side, allowing to dry completely between each.

One other technique you can do is cut longer strips of tin and twist for a spiral look.


Bend the chain links open with a pair of needlenose pliers and hook them as necessary. Hook them together or onto an old keychain.

You can also hook the soda can tab onto it as well for an extra little addition.


I really love the result of these and especially how cheap and thrifty they are. I bet you will love them too.


**Update: I've made a few more of these with stronger chain links! Look at how cute


I would love to see your versions of these cute key chains! Or what other creative ideas other people have. Don't forget to pin me

Tuesday, June 4, 2013

DIY Magnet Board

I noticed my makeup drawer getting a little cluttered the other day. I already have it organized into a makeup box, but I thought it was about time I got some of the eyeshadow singles out of the drawer and up onto the wall. 


I've seen posts for the magnetic makeup board for a long time now. I like the fact that it doesn't only have to be used for makeup, but can be used as a magnet board in an office or bedroom. Hubby likes that it feels less cluttered on the bathroom counter. It's practical for me and him.


For the board

You will need:
A flat metal sheet with dull corners and edges - don't cut yourself or the fabric.
Enough fabric to cover the baking sheet entirely, ~1/2 yard - 1 yard depending on the metal you use. The fabric must be durable enough to be glued.
Glue. I used hot glue. Make sure the glue you use is safe for the fabric you choose. 
Optional: Frame to fit metal, acrylic paint, brushes


Start by lining the metal with fabric. Lay the metal down flat on the face down fabric. Fold and glue the fabric around the back of the frame and make sure to pull fabric taut. Set aside to dry.


For the magnets

You will need:
Tacky Glue
Box of magnets, found in craft stores and craft aisles.

Use the tacky glue as directed on whatever you want to make into a magnet.


Sunday, June 2, 2013

DIY engagement ring holders

I was at Hobby Lobby the other day and their frames were on sale, I went looking through the regular picture frame area and found these adorable little frames - about 3" x 3". I couldn't help myself but to buy a couple. I saw no use in putting itty bitty pictures in them but I figured I could do something with them.

Materials
  • Small frames
  • Nail
  • Pliers & needlenose pliers 
  • Super glue, or E4000
  • Glue gun/glue sticks

Optional: ribbon


Get your nail and hold half of it with the pliers, grab the other side with the needle nose pliers and bend it so it has a curve.

Disassemble the frames. Remove the glass and throw away.

Glue four big dots on the backing of the picture frame (the dots will go on the front). This is because without the glass the backing will be loose, and putting the glue dots helps it stay in place. Once the four dots are in place, make a glue dot in the center or upper center of the picture frame. Attach the nail by the head. here and add additional hot glue if needed.
Reassemble frame.

Attach a ribbon bow with hot glue or leave it plain. These are perfect for the kitchen, bathroom or bedroom. You will love it.  This also makes for the perfect engagement gift! 


Friday, May 31, 2013

Lace Spray Paint Shirts


Materials
-Clothing to dye (light colors will work best, white, yellow, light pink.. etc) - clothes may shrink, buy big!
-Spray dye - I found them at Hobby Lobby for $2.99 per color
-Lace or doilies
-Soda Ash... also found at Hobby Lobby in the fabric dye aisle. $5.99 for  two 1 gal batches.
->1gal bucket with lid.
-Clothes pins

  • Prepare your fabric first! Wash your clothes normally. 
  • Wearing gloves, mix soda ash with water in the bucket. The soda ash usually has directions, but the measurements should be  1/2 cup soda ash : 1 gallon of water. 
  • Soak fabric in soda ash for 20 minutes. 
  • Allow the fabric to dry on a flat surface before spray dyeing.
  • After the shirt has dried, or almost dried, lay lace or doily on clothes. Secure with clothes pin
  • Spray the shirt with the dye per directions on the dye.
  • Once the shirt is colored to your liking, dry flat.
  • When dry, heat set in the dryer on high setting for at least 20 minutes


This has definitely been one of my favorite projects. The many different ways to customize these are perfect. You can easily cut out words or other pictures even to spray around and create so many shirts! What's better than custom shirts?

SaveSave

Tuesday, April 23, 2013

About Justine

Hi there everyone! I'm Justine and I've had this blog for about 3 years now! I am creative and love to do crafts and projects in my spare time. I pair crafting with some drinking quite often. I love a glass of wine (or a few) with my projects and plan to become more active in posting what kind of wine I drink while I craft. 

My favorite craft is scrapbooking. I have also been known to make my own Halloween costumes, invent storage solutions, and decorate the home. 

Besides crafting, I go to school full time and work full time. I enjoy exploring my home state of New Mexico and planning my next getaway. 

I hope to see many readers who enjoy crafting as much as I do and sharing my ideas with others!